

Catching Water Damage Early: Siding Repair in Vancouver, WA After a Wet Winter
Learn how wet winter weather can hide rot, leaks, and loose materials, and how siding repair in vancouver, wa helps homeowners assess damage, choose repairs, and protect an exterior
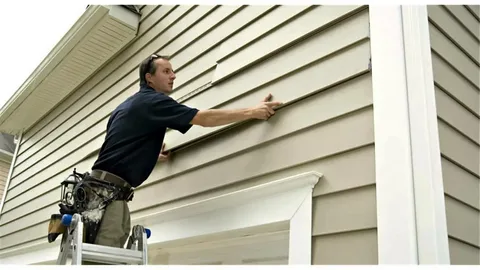
A wet winter can leave siding looking sound while moisture works behind it. Rain can enter at cracked caulk, loose panels, window trim, roof-to-wall transitions, or damaged flashing. Because the outer surface often hides the condition of the sheathing and framing, a small stain deserves attention before it becomes a larger repair. For homeowners considering siding repair in vancouver, wa, the first decision is not whether to replace every panel; it is finding where water enters and how far it has traveled. A focused inspection helps separate surface maintenance from damage that needs removal and drying. Resources from Essential Construction LLC can help a property owner understand the questions to ask before arranging an assessment.
Key Takeaways
-
Stains, swelling, soft spots, and recurring leaks can point to moisture behind the siding.
-
Repair scope depends on the water source, affected materials, siding condition, and hidden damage.
-
A careful inspection is the best starting point before choosing patching, partial replacement, or broader work.
Why Wet Winters Expose Siding Problems
Siding is only one part of a home's exterior wall system. Behind it are components such as a drainage plane, flashing, house wrap, sheathing, insulation, and framing. During siding repair in Vancouver, WA, identifying how these layers work together is important because water can enter through an opening and travel sideways or downward before an interior stain appears. By the time visible damage develops, the affected area may be far from the original point of moisture entry.
Repeated wet weather also tests small weaknesses. Caulk can separate, fasteners can loosen, and trim joints can open as materials expand and contract. Gutters and downspouts may direct water toward a wall instead of away from it. None of these conditions automatically means extensive damage, but each gives an inspector a reason to look more closely.
Early Clues Worth Inspecting
A homeowner does not need specialized equipment to document warning signs. Photos, dates, and notes about where a problem appears after rain can help an inspection begin with useful information. Common clues include:
-
Siding panels that bulge, ripple, cup, or pull away from the wall.
-
Soft areas around windows, doors, corners, or lower wall sections.
-
Peeling paint, dark staining, mildew-like growth, or failing caulk.
-
Interior discoloration on drywall or trim near an exterior wall.
-
A musty odor or recurring dampness in a room, crawlspace, or wall cavity.
These signs have more than one possible cause. For example, staining may come from a roof or plumbing issue rather than the wall cladding. The value of an inspection lies in tracing the moisture path instead of assuming the most visible material is the source.
What Actually Determines Repair Scope
The first step in addressing exterior wall damage is identifying the original entry point. A failed section of flashing may allow water behind otherwise serviceable siding, making replacement alone insufficient. Professional siding services should include careful inspection of roof edges, windows, doors, decks, utility penetrations, and transitions between materials, as these areas can interrupt the wall’s drainage and weather barrier. Repairing the underlying issue helps prevent recurring moisture problems.
The second factor is the condition of the layers behind the siding. If sheathing is dry and sound, a repair may stay limited to trim, sealant, flashing, or a few panels. If the wood is swollen, soft, or deteriorated, the affected area may need to be opened so damaged materials can be removed and the wall can dry. Hidden moisture can also change the work sequence and the estimate.
Material matching matters as well. Siding color, profile, texture, age, and exposure can make a small replacement visible. A matching panel may be available, or a broader section may produce a more consistent appearance. The practical choice depends on condition, availability, location, and the property owner’s priorities not appearance alone.
Repair, Partial Replacement, or Full Replacement?
Once the source and extent of moisture are understood, several approaches may be reasonable. A sound decision accounts for both immediate damage and the chance that the same area will be exposed again.
-
Targeted repair: This may suit an isolated crack, loose trim piece, failed joint, or limited panel damage after the water source has been corrected. Its benefit is a smaller work area; its limitation is that it is not suitable when surrounding materials are also compromised.
-
Partial replacement: Removing a larger section can make sense when several panels or the underlying sheathing are affected. It allows better access for inspection and drying while avoiding unnecessary replacement of intact walls.
-
Broad replacement: This may be considered when damage is widespread, matching material is unavailable, or the existing siding has reached the end of its useful condition. It involves more disruption and cost, so it should follow evidence of broad need rather than a single stain.
Temporary caulk or surface coating can sometimes reduce exposure while a permanent repair is arranged, but those measures should not conceal active moisture. A repair that closes the surface before the cavity is dry may trap the very problem it is meant to solve.
A Practical Inspection Checklist
A useful assessment is more than a quick look at the damaged panel. It should connect visible conditions to the way water moves through the exterior. Important points include:
-
Trace the wall area above and beside the visible stain, not only the stain itself.
-
Check flashing, trim joints, penetrations, and transitions for openings or poor drainage.
-
Look for movement, swelling, decay, or fastener failure in the siding and nearby materials.
-
Examine accessible sheathing or framing when the wall is opened, using appropriate moisture checks.
-
Identify the repair boundary, likely materials, access needs, and steps for keeping water out afterward.
An inspection should also distinguish active moisture from old staining. A moisture meter can support an evaluation, but readings need context because materials, temperature, and location affect what the numbers mean. The goal is a sound diagnosis, not a single measurement taken out of context.
Avoidable Mistakes That Let Moisture Spread
The most common errors usually come from treating a visible symptom as the entire problem. A careful plan avoids several shortcuts:
-
Painting over discoloration: This improves appearance temporarily but does not correct water entry or damaged wood.
-
Replacing only the lowest panel: Water may have entered higher at a window, roof edge, or wall penetration.
-
Using caulk as the main repair: Sealant cannot replace missing flashing or correct a drainage path that sends water toward the wall.
-
Waiting for interior damage: By the time drywall or trim shows moisture, hidden materials may already require review.
Another mistake is assuming that a dry day proves the wall is healthy. Water intrusion can be intermittent, and a cavity may dry at the surface while remaining damp deeper inside. Notes from several rain events can help reveal a pattern that a single visit misses.
Local Conditions That Shape the Decision
In Vancouver, WA, a wet winter can keep exterior materials damp long enough for small openings to matter. Rain may enter at horizontal joints, run behind trim, or collect where gutters and downspouts do not direct water away from the wall. A wet-weather siding inspection in Vancouver should therefore consider the full drainage route, including nearby roofs, decks, windows, and ground-level splash areas.
Local building details and property layouts also affect access. A steep grade, attached deck, landscaping, or narrow side yard may limit visibility and require a different inspection method. If work could affect structural materials or involve a larger exterior alteration, the property owner should ask which local requirements apply before work begins rather than assuming every repair follows the same process.
Planning the Next Step After Inspection
A written scope can make estimates easier to compare. It should identify the suspected water source, the materials that may need removal, the repair boundary, and how exposed areas will be protected during the work. It should also explain whether painting, trim replacement, or finish matching is included.
Timing matters, but rushing can create its own problems. A property owner may prefer to address active leaks quickly while scheduling cosmetic replacement separately. Seasonal planning also fits into broader Pacific Northwest home exterior maintenance, including gutter care, caulk review, paint checks, and periodic inspection of vulnerable joints.
The best question is not simply how much a repair costs. It is what condition the price addresses, what remains uncertain, and what steps will prevent the same pathway from causing another problem. Clear answers help a homeowner choose an appropriate scope without paying for work that the evidence does not support.
Conclusion
Early attention can keep a small siding concern from becoming a hidden wall problem. The right response starts with tracing the water source, checking the materials behind the surface, and matching the repair scope to the actual condition. Patching, partial replacement, and broader replacement all have a place, but none should be selected from appearance alone.
Arrange an Exterior Assessment
After a wet winter, a homeowner does not need to guess whether stained siding is cosmetic or a sign of deeper moisture. An exterior assessment can trace the water path, identify damaged materials, and separate routine maintenance from repair work. Before scheduling service, the property owner can gather photos, note when signs appear, and ask what areas will be inspected. Early, specific information makes the next decision clearer and helps prevent avoidable disruption.
Frequently Asked Questions
How soon should a homeowner inspect suspected water damage?
An inspection is appropriate when staining, swelling, soft spots, or recurring leaks appear, especially after several wet days. Active leaks or rapidly worsening damage deserve prompt attention because continued exposure can increase the affected area.
Can damaged siding be repaired without replacing the whole exterior?
Often, yes. If the issue is limited to a small area and matching materials are available, targeted or partial work may be suitable. Broader replacement becomes more reasonable when damage is widespread, the material is badly deteriorated, or a consistent match cannot be made.
Why is finding the water source more important than replacing a panel?
A new panel will not stop water entering through failed flashing, an open trim joint, or a nearby roof transition. Correcting the source first reduces the chance that replacement materials will be exposed to the same moisture path.
What can be checked before a professional assessment?
A property owner can photograph damaged areas, note when stains appear, inspect visible caulk and trim, and check whether gutters discharge near the wall. Interior marks and musty odors should also be recorded, but walls should not be opened without considering safety and the possibility of concealed utilities.
Does a moisture reading alone determine the repair needed?
No. A reading is one piece of information and must be considered with material type, location, weather history, visible damage, and the likely water source. A complete assessment connects those details before defining the repair boundary.

Hi, I’m Freya Parker, an automotive expert focused on helping car owners make smarter decisions when selling their vehicles. I specialise in breaking down the car-selling process in a simple, practical way from understanding your car’s real value to reading market trends and spotting the right time to sell. My goal is to give you clear, honest guidance so you can confidently get the best possible price for your car without confusion or stress. Whether you’re selling for the first time or just want a better deal, I’m here to make the process straightforward, transparent, and rewarding








Comments (0)