

Outdoor Lighting in Seattle, WA for Short Winter Days
Create a safer, more welcoming yard with outdoor lighting in seattle, wa. Learn how warm LEDs, careful placement, timers, and weather-ready fixtures improve comfort and visibility in Seattle’s short winter days
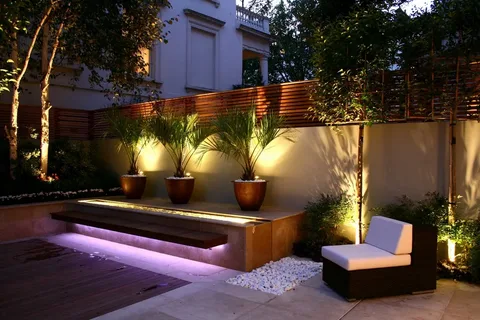
Seattle’s short winter days can make a home feel dark before dinner, especially when clouds and rain limit natural light. A well-planned system can make paths, steps, doors, and gathering areas easier to see without turning the yard into a bright stage. The best results come from using warm, low-glare fixtures, careful placement, and timers or sensors that match the household’s routine. Economy Landscaping helps frame the topic clearly: outdoor lighting in seattle, wa works best when safety, comfort, weather, and energy use are considered together.
Key Takeaways
-
Short winter daylight calls for lighting that supports safe movement and comfort.
-
Warm LED fixtures create useful light without a harsh, blue look.
-
Layered lighting works better than placing bright fixtures everywhere.
-
Timers, photocells, and motion sensors can limit waste and light trespass.
Why Winter Lighting Needs a Different Plan
Planning outdoor lighting should start with the way people move through the property after sunset. The front walk, driveway edge, steps, side gate, and back door often need the most attention. A light near each important change in level can help people judge where to place a foot, while softer illumination near seating areas keeps the outdoor space welcoming.
Seattle’s wet weather also changes how fixtures perform. Water can collect around low spots, moss can grow near shaded paths, and overgrown plants can block a beam. Fixtures should be rated for outdoor use, and their connections should be protected from moisture. A plan that looks good on a dry afternoon may need different placement after several wet days.
Layering is another key idea. Path lights handle walking areas, wall fixtures help near doors, and downlighting can spread a gentle glow from trees or eaves. These layers should overlap enough to prevent dark gaps, but they should not all shine at the same brightness. Excess light can create glare, shine into nearby windows, and make the darker parts of a yard harder to see.
Many homeowners ask whether outdoor lights need to stay on all night. In most cases, they do not. A timer or photocell can turn lights on around dusk, while a later shutoff can reduce energy use and help the property remain considerate of neighbors.
Building a Plan Around Movement and Mood
A simple site walk can reveal more than a daytime inspection. The person planning the system should visit the property after dark and note where vision drops sharply. They can also stand inside nearby rooms to check whether a fixture would shine toward a window. This small step helps prevent glare before wiring begins.
The plan should separate safety lighting from accent lighting. Safety lighting belongs near steps, gates, doors, and uneven surfaces. Accent lighting can highlight a tree, garden bed, or textured wall, but it should remain secondary to clear walking paths. When every feature receives equal attention, the yard can look flat and overly bright.
The size and shape of the lot also matter. A narrow side yard may need compact fixtures with controlled beams, while a sloped property may need step lights and low fixtures that follow the grade. Evergreen branches can block light in one season and expose it in another, so the final layout should allow for plant growth.
Planning Priorities for Short Winter Days
-
Start with steps, entrances, paths, and other areas used after dark.
-
Inspect the property at night instead of planning only from a daytime view.
-
Separate safety lighting from softer garden and seating-area accents.
-
Keep fixtures aimed away from windows, streets, and neighboring homes.
The plan should also account for how the household uses the yard. A family that brings bins to the curb before sunrise may need a different schedule from a household that entertains outdoors in the evening. Motion sensors can work well for a side gate or service path, while steady low-level light may feel better near a front entrance.
Choosing Fixtures for Seattle Conditions
For Seattle landscape lighting, fixture quality and beam control matter as much as appearance. Path lights with shields can keep light on the ground instead of in a person’s eyes. Step lights can sit in risers or nearby walls, and downlights can cast a broad wash from a tree or roof edge. Uplights should be used carefully because an exposed beam can cause glare.
LED fixtures are a common choice because they use less electricity than older incandescent lamps and usually need less frequent lamp replacement. The light color still deserves attention. Warm white light often feels more comfortable in a garden, while very cool light can look stark against wood, stone, and green plants. A consistent color across nearby fixtures usually looks more natural than mixing several shades.
Shielding and beam angle are practical details that are easy to overlook. A narrow beam can draw attention to a tree trunk or architectural detail. A wider beam can cover a path or planting bed. The fixture should match the job rather than being selected only for its shape.
Wall sconces and door lights should be high enough to illuminate the entry without shining directly at eye level. For driveways, low fixtures can mark edges without creating a row of bright points. Any light aimed toward a public sidewalk should be adjusted so it helps people see the route without spilling into passing traffic.
Fixture Choices at a Glance
-
Use shielded path lights for walking routes and garden edges.
-
Choose step lights where changes in level could be hard to see.
-
Select warm LEDs for a softer look near homes and seating areas.
-
Match beam width to the feature or surface being lit.
A balanced design usually uses fewer fixtures than a first draft. If the main path is visible, the entry is easy to find, and key steps are clear, additional lights may add little value. Spacing should follow the landscape rather than create a rigid line along every border.
Installation Details That Matter
When comparing Seattle outdoor lights, the installation plan should receive as much attention as the fixture list. Low-voltage systems use a transformer to reduce the voltage sent through landscape wiring, but the work still needs careful planning. Cable routes should avoid areas likely to be disturbed by digging, edging, or future planting.
Outdoor connectors must be made for damp conditions, and fixtures should sit securely so they do not tilt after rain or soil movement. On sloped lots, water should be allowed to drain away from equipment. A sealed fixture can still have problems if its connection sits in a low place where water gathers.
Controls can make the system easier to live with. A timer follows a set schedule, while a photocell responds to changing daylight. Motion sensors are useful in places that need light only when someone passes. Some properties benefit from a combination, such as steady entry lighting with motion-activated side-yard lighting.
Maintenance is part of the original decision. Lenses may need cleaning, branches may need trimming, and fixtures may need realignment after heavy weather or landscape work. A yearly review, along with checks after major storms, can catch blocked beams, loose fixtures, and damaged connections before they become larger concerns.
Installation Checks Before the First Night
-
Confirm that fixtures, connectors, and controls are rated for outdoor conditions.
-
Keep wiring routes clear of likely digging and planting areas.
-
Place transformers and connections where water will not collect.
-
Plan for future trimming, repairs, and fixture adjustments.
The total project effort depends on the number of fixtures, cable distance, terrain, power needs, and control choices. A small entry update may be simple, while a large yard with several zones can require more planning. A written layout can help a homeowner compare options without focusing only on the fixture price.
Common Mistakes to Avoid
The most common mistake is using brightness as a substitute for placement. A very bright light near a door can make nearby shadows seem deeper and may bother people inside the home. Several lower-output fixtures often create better coverage and a calmer view.
Another mistake is aiming lights at windows or reflective surfaces. Glass, pale siding, and wet pavement can bounce light back toward the house. Fixtures should be viewed from the places where people will stand, not only from the spot where the installer places them.
Ignoring plant growth can also change the design. A shrub that is small during installation may cover a path light later. Tree branches may block a downlight or create moving shadows. Leaving access around fixtures makes future care easier.
Finally, many systems lack a clear control plan. Lights that run from dusk until morning may waste energy when no one is outside. Lights that switch on too late can fail to help with the busiest part of the evening. The schedule should match real habits and be adjusted as winter daylight changes.
Frequently Asked Questions
What color temperature works well for a Seattle yard?
Warm white light is often a comfortable choice for homes, gardens, and outdoor seating. Many residential fixtures fall around 2700K to 3000K, but the best selection depends on the home’s siding, hardscape, and existing lights. Consistency matters more than chasing one exact number.
Can outdoor lighting improve security?
It can make doors, gates, and walking routes easier to observe, but lighting is only one part of home security. Even coverage is usually more useful than harsh brightness. Motion sensors can draw attention to movement in selected areas without keeping every fixture on all night.
Are low-voltage lights safe in wet weather?
They can be suitable for outdoor use when the system uses rated equipment, protected connections, and careful installation. Low voltage does not remove the need for proper drainage and regular inspection. Damaged cables or loose connections should be addressed promptly.
How many fixtures does a small yard need?
There is no single number that fits every property. The layout, slope, path length, plant growth, and desired light level all affect the answer. A nighttime walk can show whether one fixture fills a gap or whether several smaller sources would create smoother coverage.
Should motion sensors replace timers?
Not always. Timers or photocells provide predictable light at entrances, while motion sensors suit occasional-use areas such as side yards. Combining controls can reduce unnecessary operation while keeping key routes visible when people arrive home.
How often should landscape lights be checked?
They should be reviewed when plants grow across the beam, after landscape work, and after severe weather. Seasonal checks can also reveal dirty lenses, shifted fixtures, water around connections, or a schedule that no longer matches the household’s routine.
A Better Winter Evening Starts With Thoughtful Light
Outdoor lighting works best when it responds to the property rather than covering every surface with equal brightness. Careful placement, warm LEDs, protected wiring, and useful controls can make winter arrivals safer and outdoor spaces more pleasant. A nighttime review gives homeowners the clearest view of what needs light, what should remain quiet, and where small changes can make the largest difference.
Plan the Next Step
Homeowners who want a clearer plan can begin with a walk around the property at dusk. They can note dark steps, slick paths, poorly lit doors, and areas that need a softer glow. A lighting professional can then review fixture types, wiring routes, controls, and weather protection before installation begins. Requesting a written plan helps compare options without guessing. The next step is a site review that balances safety, comfort, appearance, neighborhood courtesy, and long-term maintenance through every season.

Hi, I’m Freya Parker, an automotive expert focused on helping car owners make smarter decisions when selling their vehicles. I specialise in breaking down the car-selling process in a simple, practical way from understanding your car’s real value to reading market trends and spotting the right time to sell. My goal is to give you clear, honest guidance so you can confidently get the best possible price for your car without confusion or stress. Whether you’re selling for the first time or just want a better deal, I’m here to make the process straightforward, transparent, and rewarding








Comments (0)