

How to Repair Water-Damaged Hardwood Floors
Hardwood floor repairs for cracked, stained, cupped, and water damaged boards. Skilled repair work can restore damaged sections while preserving the original character of your flooring.
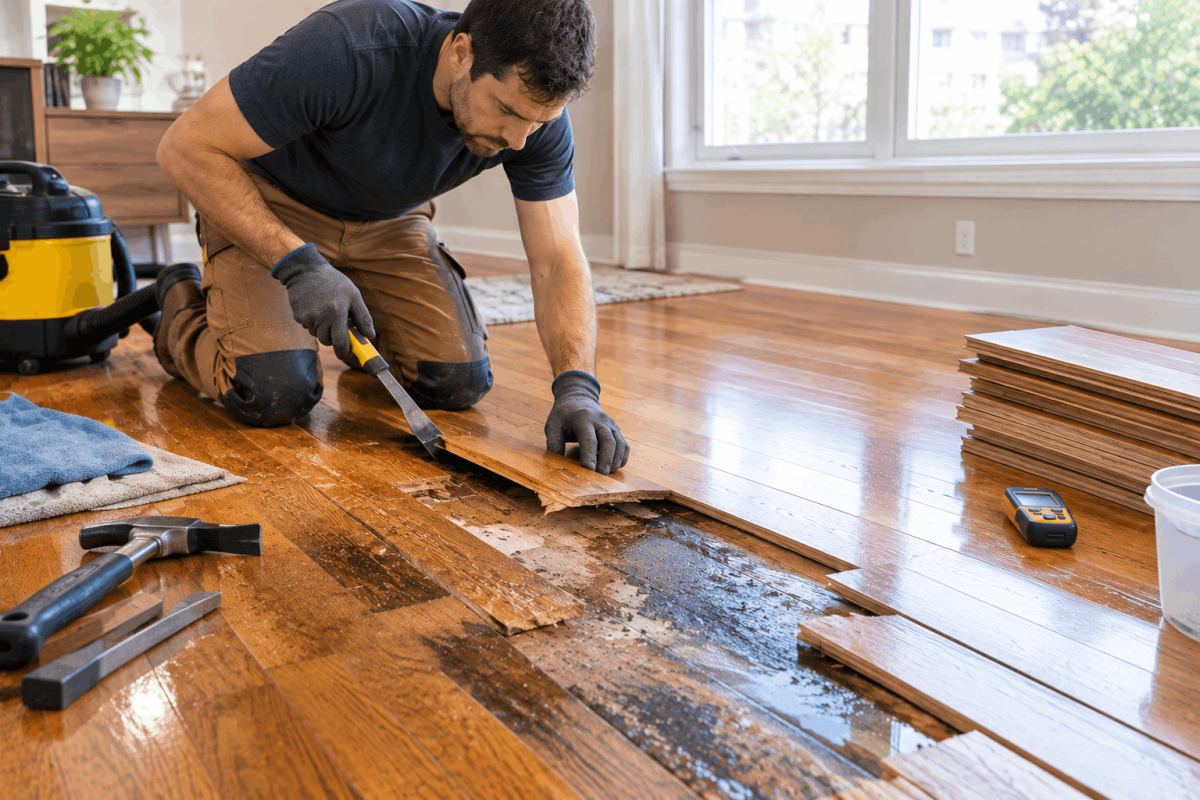
Water and hardwood floors have a complicated relationship. A little moisture now and then is manageable. A slow leak behind the refrigerator, a burst pipe under the sink, or a window left open during a Portland rainstorm is something else entirely. Water damage can turn a beautiful hardwood floor into a cupped, stained, structurally compromised mess in a surprisingly short period of time.
But here is what most homeowners do not realize until they talk to someone who actually knows floors: water damage does not automatically mean replacement. In many cases, even floors that look genuinely bad after a water event can be saved with the right approach, the right sequence, and the right repair techniques.
This guide walks you through exactly how to handle water-damaged hardwood floors, from identifying the extent of the damage to drying, repairing, and refinishing so the floor looks and performs the way it should again.
How to Identify Water Damage on Hardwood Floors
Before you can fix anything, you need to understand what you are actually dealing with. Water damage shows up in different ways depending on how much water was involved, how long it sat, and where it came from.
1. Visual Signs Your Floor Has Water Damage
The most obvious signs are visible changes to the surface of the wood. Cupping is one of the most common, where the edges of each board rise higher than the center, creating a washboard texture across the floor. This happens when the bottom of the board absorbs more moisture than the top, causing the wood to swell unevenly.
Crowning is the opposite problem, where the center of each board rises higher than the edges. This usually happens after cupping has occurred and someone sanded the floor before it fully dried, removing the raised edges and leaving the center high as the wood continued to move. Dark gray or black staining in the wood is a sign that water has penetrated deeply and begun oxidizing the wood fibers, a more serious problem that does not sand away easily. White cloudy patches on the surface usually indicate moisture trapped under the finish layer rather than in the wood itself, which is a less serious situation.
2. Structural Signs You Cannot See But Can Feel
Not all water damage is visible from a standing position. Boards that feel soft or spongy underfoot, boards that flex noticeably when you step on them, and sections of floor that have started to separate from the subfloor all indicate damage that goes beyond surface appearance. A floor that squeaks in new places it never squeaked before after a water event is telling you that fasteners have loosened or that the subfloor material has swollen and shifted.
Run your hand flat across the surface of boards you suspect were affected. Even small height differences between boards that were previously level indicate cupping or swelling that needs to be addressed before any cosmetic repair begins.
When Water Damage Goes Deeper Than the Surface
The subfloor underneath the hardwood is just as vulnerable to water damage as the wood itself, sometimes more so. Plywood subfloors can delaminate when wet, losing their structural integrity in ways that are not obvious until you start pulling boards. Concrete subfloors can develop moisture vapor transmission issues after a water event that make reinstalling hardwood over them risky without proper mitigation. Any soft spots, visible mold growth, or persistent moisture readings in the subfloor need to be addressed before the hardwood repair begins, not after.
Find and Fix the Water Source First
This step sounds obvious but gets skipped more often than you would believe. Repairing a water-damaged floor without first eliminating the water source is like patching a hole in a boat that is still sinking. The floor will continue to be damaged, the repair will fail, and you will be back at square one with more money spent and more damage done.
1. Common Causes of Water Damage in Portland Homes
Portland's climate creates several common pathways for water to reach hardwood floors. Slow plumbing leaks from supply lines, drain connections, or appliance fittings are among the most frequent causes because they often go undetected for weeks or months before the floor shows obvious signs of damage. Roof leaks that travel down through wall cavities before surfacing at the floor level are another common culprit in older Portland homes.
Foundation moisture and vapor transmission through concrete slabs or crawl spaces is a chronic issue in Portland's wet climate, particularly in homes without adequate vapor barriers under the subfloor. Condensation from HVAC systems, overflows from bathtubs or sinks, and window or door leaks during heavy rain all contribute to water damage in Portland homes across every neighborhood and home style.
2. Why Fixing the Source Before the Floor Is Non-Negotiable
Even after a flood or a major leak is stopped, residual moisture in the subfloor, wall cavities, and structural framing continues to migrate into the hardwood for weeks. If you sand and refinish a floor before that moisture has fully dissipated, the new finish will trap moisture in the wood and you will end up with the same cupping and staining problems within a few months.
Professional hardwood floor repairs always start with source identification and elimination, followed by thorough drying with moisture meters to confirm the wood has reached acceptable levels before any mechanical repair or refinishing begins. There are no shortcuts in this sequence that do not cost more money later.
How to Repair Water-Damaged Hardwood Floors Step by Step
Once the source is fixed and you understand the extent of the damage, the repair process follows a clear sequence. Jumping steps creates new problems, so work through this in order.
1. Drying Out the Floor Completely
Drying is the step most homeowners rush, and it is the step that determines whether the boards recover on their own or need mechanical intervention. Professional drying uses a combination of commercial dehumidifiers, air movers positioned to maximize airflow across and under the floor, and moisture meters to track progress at multiple points across the affected area.
For mild to moderate cupping caused by a short-term moisture event, thorough drying often allows the boards to flatten back on their own over two to six weeks as moisture equalizes through the wood. This natural recovery is the best possible outcome because it means the wood returns to its original shape without any material being removed.
Do not use high heat to speed up drying. Space heaters or heat guns applied directly to wet hardwood can cause checking, splitting, and permanent grain damage that is far harder to repair than the original water damage. Slow, controlled drying with proper airflow is always the right approach.
2. Assessing What Can Be Saved vs. What Needs Replacing
After the floor has fully dried and had time to stabilize, reassess the damage with fresh eyes. Boards that have returned to flat and show only surface staining or finish damage can often be saved with sanding and refinishing. Boards that remain cupped or crowned after full drying have sustained permanent structural deformation and need to be replaced. Boards with deep black staining that runs through the full thickness of the wood, soft spots, or visible mold growth also need to come out rather than being refinished over.
A moisture meter reading taken across the floor at this stage confirms whether the wood has truly dried or whether moisture is still present deeper in the boards. Acceptable moisture content for hardwood flooring in Portland's climate typically falls between six and nine percent. Readings above that threshold mean more drying time is needed before any sanding or finishing work begins.
3. Sanding and Refinishing Water-Damaged Sections
For boards that dried successfully and show surface staining but no structural damage, sanding is the next step. Light surface oxidation and gray water staining can often be removed with a careful sanding sequence that starts at 60 or 80 grit to remove the stain and finish layer, then progresses through finer grits to prepare the wood for new finish.
Deeper black staining that the sanding sequence does not fully remove may respond to wood bleaching treatments applied after sanding and before new stain is applied. Oxalic acid is the most commonly used wood bleach for this purpose and can neutralize iron-based staining and tannin oxidation effectively when used correctly.
After sanding, new stain and finish are applied in the same sequence as a standard refinishing project. Matching the existing floor color and sheen as closely as possible is critical when refinishing only a portion of the floor rather than the entire surface.
When a Full Refinish Is the Only Real Fix
If the water damage affected a large portion of the floor or the surface staining is widespread, refinishing just the damaged section will leave a visible line between the old and new finish that is difficult to blend invisibly. In these cases, refinishing the entire floor surface rather than just the damaged area gives you a consistent result that does not advertise the repair. The added cost of a full refinish versus a partial one is often worth it purely for the visual outcome.
Replacing Individual Water-Damaged Boards
When boards are too far gone to save through drying and sanding alone, they need to come out and be replaced. This is more involved than surface refinishing but completely achievable without disturbing the rest of the floor when done with the right technique.
1. How to Remove Damaged Boards Without Wrecking the Rest
The key to clean board removal is controlled cutting rather than prying. A circular saw or oscillating multi-tool set to cut exactly through the plank thickness, without cutting into the subfloor below, makes cuts along the length of the board near each edge. Cross cuts at each end complete the outline. The center section of the board lifts out first, then the remaining edge strips are carefully worked free from the tongue and groove joints on each side.
Done carefully, this process leaves the adjacent boards completely undamaged and the subfloor ready to accept new planks. Rushing this step or using a pry bar aggressively is the fastest way to damage boards that were not part of the original problem and turn a manageable repair into a much larger project.
2. Matching New Boards to Your Existing Floor
New boards need to match the existing floor in three ways: species, grain character, and finished color. Species matching is typically straightforward. Grain character is trickier because replacement boards cut from new lumber often have a tighter, more uniform grain than older boards that have aged in place for decades.
For Portland homes with original Douglas fir, old-growth oak, or other species that are harder to source new, reclaimed lumber from local salvage yards is often the best solution. Pre-aged reclaimed boards blend far more naturally into an existing floor with character and patina than freshly milled new material. Stain matching then fine-tunes the color to align with the surrounding floor.
Preventing Water Damage From Happening Again
After going through a water damage repair, the last thing you want is to deal with the same problem six months later. A few consistent habits and some basic maintenance protect your investment going forward.
1. Moisture Control Habits That Protect Your Investment
Inspect the caulking and sealing around sinks, tubs, showers, and appliance connections twice a year and reseal anywhere the caulk has cracked, pulled away, or discolored. Check supply line connections under sinks and behind appliances regularly, because slow drips at these connections are the most common source of undetected long-term water damage to hardwood floors.
In Portland's climate, managing indoor humidity year-round is essential for hardwood floor health. Keeping indoor relative humidity between 35 and 55 percent prevents both the excessive moisture that causes cupping and the excessive dryness that causes cracking and gapping. A whole-home humidifier in winter and a dehumidifier during Portland's wettest months keeps that balance without constant manual adjustment.
2. Products and Maintenance Routines That Help
Avoid wet mopping hardwood floors entirely. A barely damp microfiber cloth or a hardwood-specific cleaning product sprayed lightly and wiped immediately is all that is needed for routine cleaning. Standing water from any source, including over-wet mopping, should never sit on a hardwood floor for more than a minute or two.
Place quality mats at every exterior door to catch moisture and debris before it reaches the wood. Use waterproof mats specifically under pet water bowls, plant pots, and near appliances like refrigerators and dishwashers that have a history of dripping or leaking. These small habits prevent the majority of water damage situations that lead to costly repairs.
When to Call a Professional for Water-Damaged Hardwood Floor Repairs
Some water damage situations are genuinely manageable as DIY projects for a skilled and patient homeowner. But several scenarios call for professional assessment and repair rather than a weekend project approach.
If the water damage covers more than a few boards, if the subfloor shows any signs of damage or mold, if moisture meter readings remain elevated after extended drying, or if the floor needs board replacement across multiple areas, professional hardwood floor repairs near me is the right call. Professionals bring commercial drying equipment, moisture diagnostic tools, and the experience to distinguish between boards that are recoverable and boards that need to come out before the repair looks right.
The All Seasons Floors team handles water damage repairs across Portland regularly, from isolated board replacement in a bathroom doorway to full floor restoration after appliance failures and plumbing events. Getting an honest professional assessment of your specific situation costs nothing and tells you exactly what the floor needs rather than leaving you to guess.
Conclusion
Water-damaged hardwood floors feel like a disaster in the moment, but they are almost never the total loss they appear to be. The right sequence of drying, assessment, targeted repair, and refinishing saves floors that most homeowners assume are beyond help. The keys are patience with the drying process, honesty about which boards can be saved and which cannot, and quality workmanship in the repair and refinishing stages. Take care of the source first, give the floor the time it needs to dry properly, and then work through the repair systematically. Your floors have more life in them than the water damage makes them look like, and the right approach brings that life back.
FAQs
1. Can cupped hardwood floors go back to flat after water damage?
Yes, mild to moderate cupping often self-corrects after the moisture source is removed and the floor fully dries over several weeks.
2. How long does it take for water-damaged hardwood floors to dry?
Depending on the extent of saturation, professional drying with commercial equipment typically takes one to three weeks before moisture levels reach acceptable ranges.
3. Do I need to replace water-damaged hardwood boards or can they be refinished?
Boards that dry flat and show only surface staining can often be refinished. Boards that remain cupped, feel soft, or show deep black staining typically need replacement.
4. Does homeowners insurance cover water-damaged hardwood floor repairs?
Coverage depends on the cause. Sudden events like burst pipes are usually covered. Slow leaks and gradual damage are often excluded, so check your specific policy.
5. How do I find professional hardwood floor water damage repair near me?
Search for flooring contractors with specific experience in water damage restoration and hardwood floor repairs, ask for references from similar projects, and confirm they use moisture meters to verify drying before any repair work begins.
Frequently Asked Questions

Complete flooring services Portland including hardwood, laminate, and vinyl installation, backed by skilled craftsmanship and a commitment to lasting quality results.


Comments (0)