What Does LOD Mean in BIM and Why Do Its Levels Matter?
Discover what LOD means in BIM and why its levels matter. Learn how proper LOD improves accuracy, collaboration, and project efficiency in 3D models.
Imagine a construction site where the architect, engineer, and contractor expect different details. The architect sees a rough sketch, the engineer waits for exact dimensions, and the contractor hopes for construction-ready plans. Confusion grows, mistakes follow, and money gets wasted.
Modern projects use BIM, or Building Information Modeling, to avoid this. BIM creates a digital model that everyone can see and use. But even with BIM, people often ask, “How much detail is enough?”
This is where LOD steps in. LOD means Level of Development. It sets clear rules for detail at each stage. In this blog, we explain what LOD means, describe its levels, and show why they matter.
What is LOD in BIM?
LOD stands for Level of Development. Many people confuse it with Level of Detail, but they are not the same. Level of Detail only shows how much information you can see. Level of Development shows how reliable and usable that information is. This difference matters because design choices depend on trust in the model. A wall drawn with rough lines is not the same as a wall with exact size and material. By using LOD, teams agree on how much detail should appear at each stage. It sets a clear standard. Architects, engineers, and contractors all know what to expect. This shared understanding saves time, prevents errors, and makes collaboration far smoother.
If you want to know more about what is LOD in BIM ? really means, keep reading or explore our detailed guide below.
Why LOD is Important in BIM Projects
LOD creates a common language for every person on the project. Architects, engineers, and contractors know exactly what the model shows. This shared language removes doubt and saves endless explanations.
It also cuts down errors. When one team sees a rough sketch and another expects exact details, mistakes happen. LOD stops this confusion before it starts.
Decision-making also becomes easier. At each stage, teams know the level of detail they can trust. Early designs show ideas, while later models give exact data. This makes planning and choices clear.
Clients also gain more confidence. They see steady progress and understand what the model represents at every point. This builds trust and improves satisfaction. Projects move forward with less tension, fewer disputes, and stronger teamwork.
The Different Levels of LOD Explained
LOD works in steps. Each step shows how much detail the model should carry at that stage. Let’s break them down.
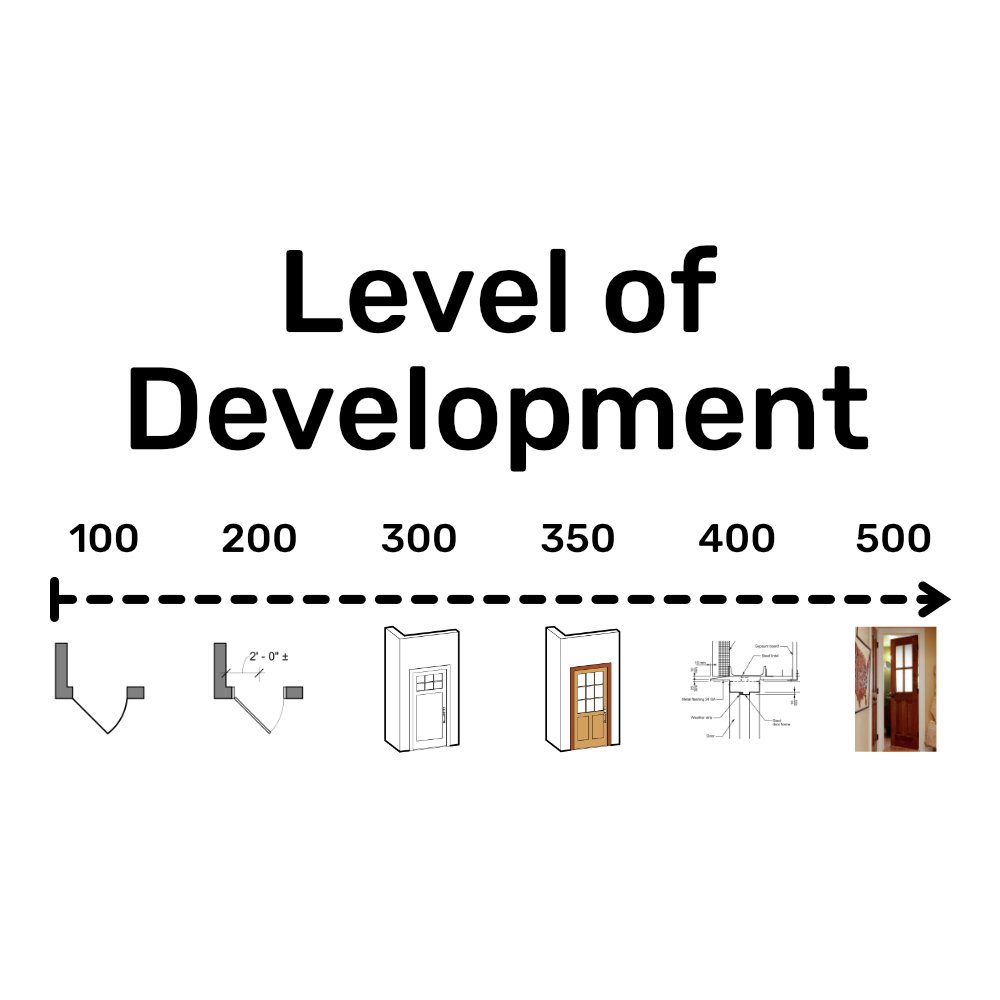
LOD 100 – Conceptual Stage
This is the first step. The model shows only basic shapes and rough outlines. It gives an idea of height, width, and location. At this point, the model is more for discussion than for construction. Example: a simple block showing where a building might stand.
LOD 200 – Approximate Geometry
Here, the model starts to take shape. Elements get approximate size, position, and orientation. The details are still generic, but they guide design talks. Example: walls, windows, and doors placed without exact material or size.
LOD 300 – Detailed Design
At this stage, the geometry is accurate. Dimensions are clear, and coordination between trades becomes possible. Teams can rely on this level for design checks. Example: structural columns and beams shown with correct size and placement.
LOD 350 – Enhanced Coordination
This level adds connections and interfaces between systems. It shows how elements interact with one another. Example: ducts passing through walls or how pipes connect to equipment. This step helps avoid clashes.
LOD 400 – Fabrication Ready
Here, the model is precise enough for actual construction and manufacturing. Every component has the information needed for production. Example: shop drawings for steel members or exact details for HVAC units.
LOD 500 – As-Built Model
This is the final stage. The model reflects exactly what has been built on site. It includes dimensions, materials, and installation details. Example: a digital twin of the finished building used for maintenance.
Each level builds on the last one. From rough sketches to detailed as-built records, LOD guides progress step by step. It ensures that everyone knows what to expect at every stage.
How LOD Levels Impact a 3D BIM Model
LOD levels guide a model from rough sketches to precise construction details. Early stages show ideas, later stages give exact dimensions.
They improve clash detection. Teams can see where systems like plumbing and electrical might conflict. This reduces mistakes and rework on site.
Scheduling and costing become more reliable. Accurate models let planners know how long tasks take and what materials are needed. Resource planning becomes easier.
LOD also adds long-term value. A detailed model helps facility managers track building components after construction. Maintenance, repairs, and upgrades become simpler and faster.
In short, proper LOD ensures the 3D BIM model is useful at every stage. Teams save time, cut costs, and avoid surprises. Clients and stakeholders gain confidence in project progress.
Common Challenges with LOD in BIM
One major challenge is confusing detail with development. Teams may assume the model is more reliable than it is.
Different teams often expect different LOD levels at the same time. Architects, engineers, and contractors can clash on expectations.
Requesting a higher LOD too early adds cost and delays. Models take longer to produce, and changes become expensive.
Clear contracts help prevent disputes. Defining which LOD is needed at each stage keeps everyone on the same page.
Without clarity, projects face confusion, mistakes, and wasted effort.
Best Practices for Managing LOD
Start by defining LOD requirements clearly in a BIM Execution Plan (BEP). This sets expectations for everyone.Match LOD to the project stage. Avoid over-modeling early, as it wastes time and resources.Communicate LOD expectations with all stakeholders. Make sure architects, engineers, and contractors know what is required at each step.Follow recognized industry standards like AIA or BIMForum. These guidelines provide clear rules and help teams stay aligned.Using these practices keeps projects smooth, reduces errors, and ensures the 3D BIM model remains reliable and useful throughout the project.
Conclusion
LOD brings consistency, accuracy, and trust to every BIM project. Teams know what to expect at each stage.Choosing the right LOD saves time and cuts unnecessary costs. It prevents mistakes and reduces rework on site.When applied correctly, LOD makes BIM most effective. Models move from rough ideas to precise, usable tools. Architects, engineers, contractors, and clients all benefit. A trusted BIM Engineering & Consulting Company can guide teams to apply the right LOD with precision. Clear LOD ensures smoother projects, better collaboration, and reliable results from design to building maintenance.